Diaper bags are mislabeled. Rarely will you ever pull a diaper out of your diaper bag. Why? Well, if you’re like us, we usually just change the kiddos in the trunk of our hatchback, so we keep a fully stocked diaper changing station there. A diaper bag is really a cooler for milk/formula at first and then becomes your magical Mary Poppins bag of stuff that will hopefully keep your kiddo(s) from losing their minds at an inopportune time. With that, let’s get to shopping and packing…
Picking the Right Bag for you
Diaper bags come in a few varieties (i.e. over the shoulder versus backpack), but don’t get distracted by looks. Now is not the time to focus on fashion. You will be taking this bag everywhere for the next 3 – 4 years, longer if you have multiple children, and it needs to do a lot of things, so focus on function! What does your bag need to do?
- Keep bottles cold. This means your bag has to have a lot of insulated cooler space with wide pockets and/or tall zippers. Dr. Brown’s Wide-Neck Bottles are big around and tall. I never found a bag that held more than one fully assembles with the cap. Instead, I would use the flat tops to seal the bottles and store the pieces in a baggie bag. It’s not ideal, but it worked.
- Organize things important to you. Face it, running around with kids is exhausting and parents don’t do the best job at self-care. Usually, this means you forget to change your underwear or something benign, but for Grant, this can be deadly. Grant is Type 1 diabetic and basically blind (not really, but close). We keep everything he needs to check his blood sugar, a fist full of fruit snacks, and an extra set of contact lenses in a special pocket in the diaper bag. This helps make sure he can take care of himself no matter where he is if he’s with the kids. Do you think you’ll have your laptop with you a lot or want to charge your cell phone or anything else you would think about with luggage? Diaper bags come with all sorts of special accommodations, so think about what might be really important for you to have to help narrow down your choices.
- Hold everything else. You’ll need to store a lot of stuff and likely you’ll be “co-organizing” this bag with your partner or another caregiver. You may have great ideas about how everything will fit into each little pocket, but trust me, it’ll never go back into a specific pocket. Don’t waste your time with a ton of internal organizational mechanisms. One big open space is all you need — aside from the pockets listed above.
CoolBELL Baby Diaper Backpack with Insulated Pockets or Tactical Baby Gear Daypack 3.0 Tactical Diaper Bag Backpack


I really like the CoolBELL Baby Diaper Backpack with Insulated Pockets. This is our second diaper bag and we’ve been using it for about a year. It ticks off all the items listed above. It also comes with a changing pad (which I donated to charity as soon as I unpacked it — more on this later). One neat feature this bag has is a wet pocket. Basically, a built-in plastic bag for wet or soiled clothes. I often forget to empty said pocket, so it’s not so great for me, but you get the idea.
I also have friends who swear by the Tactical Baby Gear Daypack 3.0 Tactical Diaper Bag Backpack. I’ll say up front, this bag is pricey. But, there are a ton of ways to customize it and it has add-on coolers. It’s also super durable. If you are going to be outdoors a lot I’d seriously look at this as an investment into that hobby. For day-to-day AC dwellers like myself, it’s a bit overkill.
What Goes In It
Once you pick your bag, what do you put in it and how do you organize it? The answer…Plastic baggies — good ol’ gallon and quart size baggies. Pack each of your plastic baggies with the items below. Then see how to stack all of these in your bag for easy retrieval.
Clothes – Gallon Size
- Zipsuit or Onesie
- Pants or Shorts & Top
- Drool Bandana
- Socks
- Hat
- Sunshirt
- Underwear (if using)
- Empty gallon-sized baggie labeled “DIRTY” to store dirty clothes.
- All clothes should be labeled with your child’s name.
Grooming – Quart Size
Health – Gallon Size
- Tylenol
- 5 Oral Syringes
- Temporal Thermometer
- Bulb syringe
- 5 Adhesive bandages
- Grooming Baggie
Toys – Gallon Size
Diapers – Gallon Size
Food Stuffs – Gallon Size
- Formula Mix – If you’re using it, you’ll want to keep 12-15 scoops of your chosen formula in your Food Stuffs Baggie. I use a quart baggie there are tons of formula holders like this or this.
- Formula Scoop – Once you finish your first can of formula, clean off that scoop and stick it right into your Food Stuffs Baggie. Pro-tip: don’t put your scoop in with the formula or you’ll need to go dig it out every time you want to make a bottle.
- 1-2 Pouches – If your kid is eating solids this is another must-have for unexpected delays during meal-time.
- 2 packs of Instant Oatmeal – Once your child starts eating solids (maybe as early as 4 months old) you may find yourself in need of an instant meal. Just add hot water and you’re good to go.
- 1 snack-size baggie of Puffs and/or Teethers type snack
- 1 snack-size baggie of Cheerios and/or Goldfish type snack
- 2 Granola bars – Something you can snack on if you get hungry.
Essentials – Gallon Size
- Gripe Water
- 10 Pipettes
- 1 package of Boogie Wipes
- 1 Oogiebear
Packing Up
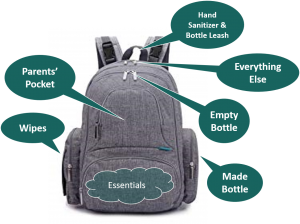
- In the appropriate pockets, stash wipes, the things you want to carry that are important to you, and an empty bottle labeled with your child’s name.
- Hang some hand sanitizer and a bottle leash from your bag handle
- Next, if you haven’t already, put your “Grooming” baggie inside your “Health” baggie do that.
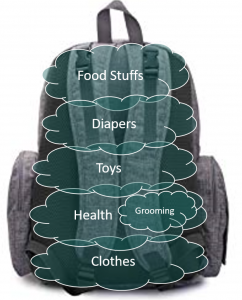
- In the main compartment layer in your baggies as shown.


Leave a Comment